
생성 패턴 Creation Pattern
싱글톤 패턴 Singleton Pattern

객체 인스턴스가 한개만 생성
정보를 보관하고, 공유하고자 하는 클래스의 객체를 한 번의 메모리만 할당하고 그 할당된 메모리에 대해 객체로 관리하는 것이 목적
ex) 회사 이름, 주소, 전화번호 등의 정보를 담고있는 Company 클래스의 객체를 하나만 생성해 두면, 서로 다른 클래스들이 Company 객체를 사용하여 회사의 정보 사용 가능
어떤 클래스에서 회사 정보를 수정하더라도 다른 객체에서 Company 객체를 조회하면 그 수정된 정보를 그대로 사용 가능
public class CompanyInfo {


    private static CompanyInfo companyInfo;
    private  String companyName;
    private  String companyAddress;


    private CompanyInfo() {

    }


    public static CompanyInfo getInstance(){
        if(companyInfo == null){
            synchronized (CompanyInfo.class){
                companyInfo = new CompanyInfo();
            }
        }

        return companyInfo;
    }

    public String getCompanyName() {
        return companyName;
    }

    public void setCompanyName(String companyName) {
        this.companyName = companyName;
    }

    public String getCompanyAddress() {
        return companyAddress;
    }

    public void setCompanyAddress(String companyAddress) {
        this.companyAddress = companyAddress;
    }

}
외부에서 CompanyInfo 클래스의 인스턴스를 new 키워드로 생성하지 않고 getInstance 메소드를 통해 접근
프로그램 실행 후 최초 호출이라면 새로운 인스턴스를 생성하고, 이미 생성된 인스턴스가 있다면 해당 인스턴스를 반환
public class SetCompanyInfo{

    public void setCompanyName(String newName){
        CompanyInfo companyInfo = CompanyInfo.getInstance();
        companyInfo.setCompanyName(newName);
    }

    public void setCompanyName(String newAddr){
        CompanyInfo companyInfo = CompanyInfo.getInstance();
        companyInfo.setCompanyAddress(newAddr);
    }
}

public class GetCompanyInfo{

    public String getCompanyName(){
        return  CompanyInfo.getInstance().getCompanyName();
    }

    public String getCompanyAddress(){
        return  CompanyInfo.getInstance().getCompanyAddress();
    }
}
SetCompanyInfo 는 회사의 정보를 수정하는 클래스
GetCompanyInfo 는 회사의 정보를 조회하는 클래스
각각 다른 클래스임에도 하나의 인스턴스에 접근하여 정보를 수정, 조회하며 정보의 동기화 가능
팩토리 메소드 패턴 Factory Method Pattern

객체를 생성할 때 필요한 인터페이스 구현
어떤 클래스의 인터페이스를 만들 지는 서브 클래스에서 결정
팩토리 메소드 패턴을 사용하면 클래스 인스턴스 만드는 작업은 서브 클래스에서 수행
ex) 어떤 상황에서 조건에 따라 객체를 다르게 생성해야 할 경우
사용자의 입력값에 따라 하는 일이 달라지는 경우
팩토리 메소드 패턴은 분기에 따른 객체의 생성을 직접 하지 않고 팩토리라는 클래스에 위임하여 팩토리 클래스가 객체 생성하도록 구현하는 방식
말 그대로 객체 찍어내는 공장
public abstract class Type{
}
public class first extends Type{
public first() {
System.out.println("first class create");
}
}public class second extends Type{
public second() {
System.out.println("second class create");
}
}public class third extends Type{
public third() {
System.out.println("third class create");
}
}public class ClassA{
public Type createType(String typeName){
Type newType = null;
if(type = "first")
newType = new first();
else if(type = "second")
newType = new second();
else if(type = "third")
newType = new third();
return newType;
}
}public class Main(){
public static void main(String args[]){
ClassA classA = new ClassA();
classA.createType("first");
classA.createType("second");
}
}
입력한 문자열에 따라 first, second, third 클래스를 생성하는 ClassA 클래스를 main 에서 활용하는 코드
여기까진 정상적으로 보이나, 문제는 ClassA 뿐만 아니라 다른 객체에서도 first, second, third 클래스 인스턴스를 생성하는 코드를 작성해야 한다면??
해당하는 모든 클래스에 if 문이나 switch 문을 사용해서 first, second, third 클래스를 생성해야 함
이는 코드의 중복에 해당하며 객체 사이의 결합도가 매우 강한 구조
결합도가 강하다면, 코드가 길어지고 복잡해질 경우 유지보수가 매우 어려움
따라서 객체 인스턴스를 생성해주는 공장, 팩토리를 사용함으로서 이런 중복된 코드의 사용을 막는 것이 팩토리 메소드 패턴
public class FactoryClass{

    public Type createType(String typeName){
        Type newType = null;


        if(type = "first")
            newType = new first();
        else if(type = "second")
            newType = new second();
        else if(type = "third")
            newType = new third();

        return newType;
    }
}
기존의 ClassA 에서 수행하던 조건 분기를 FactoryClass 가 수행
public class ClassA{

    public Type createType(String typeName){
        FactoryClass factoryClass = new FactoryClass();
        return  factoryClass.createType(typeName);
    }
}
기존의 ClassA 는 이 FactoryClass 를 사용해서 넘겨받은 문자열에 해당하는 객체 인스턴스 생성
ClassA 뿐만 아니라 ClassB, ClassC, ClassD ..... 등 같은 동작을 필요로 하는 클래스들도 마찬가지로 FactoryClass 를 사용하여 객체 인스턴스 생성을 위임하면 똑같은 조건문을 무수히 반복해 작성할 필요 X
추상팩토리 패턴 Abstract Factory Pattern

구상 클래스에 의존하지 않고 서로 연관되거나 의존적인 객체로 이루어진 제품군을 생산하는 인터페이스 제공
구상클래스는 서브 클래스에서 구현
팩토리 메소드 패턴과 비슷해 보이지만, 차이점이 존재
팩토리 메소드 패턴
조건에 따른 객체 생성을 팩토리에 위임
팩토리 클래스에서 실제 객체 생성
추상 팩토리 패턴
서로 관련있는 객체를 묶어서 팩토리 클래스 생성
팩토리를 조건에 따라 생성하도록 다시 팩토리를 만들어서 객체 생성하는 패턴
추상팩토리 패턴은 팩토리 메소드 패턴을 좀 더 캡슐화 한 방식이라고 보면 됨
ex)
한 공장에서 특정 Product 를 만들 때 부품 두 개가 필요한 상황
Product A 를 만들기 위해서는 두 부품 모두 A 제조사의 것을 사용해야 하고, Product B 의 경우는 B 제조사의 부품을 사용해야 함
이를 팩토리 메소드 패턴으로 구현해보면
public class FirstPartA implements FirstPart{
    public FirstPartA(){
        System.out.println("using first part of A");
    }
}
public class SecondPartA implements SecondPart{
public SecondPartA(){
System.out.println("using second part of A");
}
}public class FirstPartB implements FirstPart{
public FirstPartB(){
System.out.println("using first part of B");
}
}public class SecondPartB implements SecondPart{
public SecondPartB(){
System.out.println("using second part of B");
}
}
위와 같이 A, B 제조사의 부품 두 개를 생성하는 클래스를 각각 선언
public class FirstPartFactory(){

    public FirstPart createFirstPart(String type){

        FirstPart firstPart = null;
        switch(type){
            case "A" :
                firstPart = new FirstPartA();
                break;

            case "B" :
                firstPart = new FirstPartB();
                break;

        }

        return firstPart;
    }
}
public class SecondPartFactory(){
public SecondPart createSecondPart(String type){
SecondPart secondPart = null;
switch(type){
case "A" :
secondPart = new SecondPartA();
break;
case "B" :
secondPart = new SecondPartB();
break;
}
return secondPart;
}
}
첫 번째와 두 번째 부품의 Factory 클래스를 각각 선언하여 A, B 제조사 중 어떤 제조사의 부품을 생성할 것인지 선택
public class ProductFactory(){

    public void createProduct(String type){

        FirstPartFactory firstPartFactory = new FirstPartFactory();
        SecondPartFactory secondPartFactory = new SecondPartFactory();

        firstPartFactory.createFirstPart(type);
        secondPartFactory.createSecondPart(type);
    }
}
Product 를 실제 생성하는 ProductFactory
public class Main(){

    public static void main(String args[]){

        ProductFactory productFactory = new ProductFactory();
        productFactory.createProduct("A");
    }
}
원하는 Product 의 제조사를 입력하면 위의 Factory 들을 거쳐 A 혹은 B 제조사의 부품들로만 이루어진 Product 가 생성
근데 사실, Product A 라면 당연히 A 제조사의 부품을 사용하고, Product B 라면 당연히 B의 제조사의 제품들만 사용하기 때문에 각각 부품을 제조사별로 구분할 필요 없이 Product A 는 A 제조사, B라면 B의 제조사 부품만 사용하도록 생성하면 됨
public interface ProductFactory{
    public FirstPart createFirstPart();
    public SecondPart createSecondPart();
}
첫 번째 부품, 두 번째 부품을 생성하는 메소드를 가진 공통 인터페이스를 만들고
public class ProductAFactory() implements ProductFactory{

    public FirstPart createFirstPart(){
        return new FirstPartA();
    }

    public SecondPart createSecondPart(){
        return new SecondPartA();
    }
}
public class ProductBFactory() implements ProductFactory{
public FirstPart createFirstPart(){
return new FirstPartB();
}
public SecondPart createSecondPart(){
return new SecondPartB();
}
}이를 implements 하여 제조사 별 Factory 클래스를 생성
public class FactoryOfProductFactory(){
    public void createProduct(String type){
        ProductFactory productFactory = null;

        switch (type){
            case "A" :
                productFactory = new ProductAFactory();
                break;
            case "B":
                productFactory = new ProductBFactory();
                break;
        }

        productFactory.createFirstPart();
        productFactory.createSecondPart();
    }
}
원하는 제조사 별로 조건을 분기하는 기능을 가진 상위 Factory 생성 (ProductFactory 의 Factory)
public class Main {
    public static void main(String args[]){
        FactoryOfProductFactory factoryOfProductFactory = new FactoryOfProductFactory();
        factoryOfProductFactory.createProduct("A");

    }
}
이로써 원하는 제조사의 Product 를 생성 가능하게 된다
팩토리 메소드 패턴과 결과는 같지만, 추상 팩토리 패턴은 각각의 제조사별로 Product 제조 과정을 ProductFactory 인터페이스를 통해 개별로 구현이 가능

그림으로 그려보면, 이러한 방식으로 동작
- 어떤 제조사의 부품을 선택할 지 결정하는 Factory 클래스가 없어지고, ProductFactory 클래스가 추가
- ProductAFactory, ProductBFactory 클래스는 ProductFactory 인터페이스로 캡슐화
어떤 제조사의 부품을 사용할 것인지 명확하기 때문에 요청에 따른 제조사의 부품 생성 (일관된 객체 생성)
- FactoryOfProductFactory 클래스에서 컴퓨터를 생성하는 createProduct() 메소드 호출
행동 패턴 Behavioral Pattern
템플릿 메소드 패턴 Template Method Pattern
어떤 작업을 처리하는 일부분을 서브클래스로 캡슐화 하여 전체 일을 수행하는 구조는 그대로 두고 특정 단계에서 수행하는 내역을 바꾸는 패턴
전체적으로 동일하면서 부분적으로는 다른 구문으로 구성된 메소드의 코드 중복 최소화

AbstractClass
템플릿 메소드를 정의하는 클래스
하위 클래스에 공통 알고리즘 정의, 하위 클래스에서 구현될 기능을 primitive 메소드나 hook 메소드로 정의하는 클래스
ConcreteClass
물려받은 primitive 메소드나 hook 메소드를 구현하는 클래스
상위 클래스에 구현된 템플릿 메소드의 일반적인 알고리즘에서 하위클래스에 적합하게 primitive 메소드나 hook 메소드를 재정의하는 클래스
hook method
부모의 템플릿 메소드의 영향이나 순서를 제오하고 싶을 때 사용되는 메소드 형태
ex)
아이스 아메리카노, 아이스 라떼를 각각 레시피대로 제조한다고 할 때,
아이스 아메리카노는
1. 물을 끓인다
2. 끓는 물에 에스프레소를 넣는다
3. 얼음을 넣는다
4. 시럽을 넣는다
아이스 라떼는
1. 물을 끓인다
2. 끓는 물에 에스프레소를 넣는다
3. 얼음을 넣는다
4. 우유를 넣는다
이를 코드로 표현하면
public class IceAmericano {

    public void makeAmericano(){
        boilWater();
        putEspresso();
        putIce();
        putSyrup();
    }

    private void boilWater(){
        System.out.println("boil water");
    }

    private void putEspresso(){
        System.out.println("put espresso");
    }
    private void putIce(){
        System.out.println("put ice");
    }

    private void putSyrup(){
        System.out.println("put syrup");
    }
}
public class IceLatte {
public void makeLatte(){
boilWater();
putEspresso();
putIce();
putMilk();
}
private void boilWater(){
System.out.println("boil water");
}
private void putEspresso(){
System.out.println("put espresso");
}
private void putIce(){
System.out.println("put ice");
}
private void putMilk(){
System.out.println("put milk");
}
}public class Main(){
public static void main(String args[]) {
IceAmericano iceAmericano = new IceAmericano();
iceAmericano.makeAmericano();
}
}
이렇게 표현 가능
아메리카노와 라떼 사이에 겹치는 공통적으로 겹치는 메소드 확인 가능
이를 템플릿 메소드 패턴으로 바꿔보면
public abstract class CoffeTemplate(){

    final void makeCoffe(){
        boilWater();
        putEspresso();
        putIce();
        putEx();
    }

    abstract void boilWater(){
        System.out.println("boil water");
    }
    abstract void putEspresso(){
        System.out.println("put espresso");
    }
    abstract void putIce(){
        System.out.println("put ice");
    }

    abstract void putEx();
}
이렇게 공통되는 메소드와 서브클래스에서 확장해야 할 메소드를 정의 후
public class IceAmericano extends CoffeTemplate{


    @Override
    void putEx() {
        System.out.println("put syrup");
    }
}
public class IceLatte extends CoffeTemplate{
@Override
void putEx() {
System.out.println("put milk");
}
}public class Main(){
public static void main(String args[]) {
IceAmericano iceAmericano = new IceAmericano();
iceAmericano.makeCoffe();
IceLatte iceLatte = new IceLatte();
iceLatte.makeCoffe();
}
}템플릿 클래스를 상속받은 서브 클래스에서 각각 시럽, 우유를 넣도록 재정의 하고 템플릿의 makeCoffe() 메소드로 커피 생성
상태 패턴 State Pattern

특정 기능을 수행한 후 상태를 반환
동일한 메소드가 State 에 따라 다르게 동작할 때 사용할 수 있는 패턴
public interface State{
    State pushButton();
}
State 인터페이스
public class ButtonOn implements State{

    @Override
    public State pushButton() {
        return new ButtonOff();
    }
}
public class ButtonOff implements State{
@Override
public State pushButton() {
return new ButtonOn();
}
}State 인터페이스를 상속받은 ButtonOn, Off 클래스
public class Television {

    private State state;

    public Television() {
        this.state = new ButtonOff();
    }

    public void pushButton() {
        state = state.pushButton();
    }
}
public class Main {
public static void main(String[] args) throws Exception {
Television tv = new Television();
tv.pushButton(); // On
tv.pushButton(); // Off
}
}같은 pushButton 메소드를 여러번 수행하더라도, 현재 State 에 따라 다른 동작을 하도록 구현이 가능
반복자 패턴 Iterator Pattern
일련의 데이터 집합에 대해 순차적 접근 (순회) 를 지원하는 패턴
보통의 배열, 리스트같은 경우 반복문을 통해 순회 가능
But 트리같은 자료구조는 순서가 정해져 있지 않아서 각 요소를 어떤 기준으로 접근할 지 애매
이렇게 복잡한 구조의 자료에 대한 접근 방식이 공통화 되어 있다면 어떤 자료구조를 사용하더라도 Iterator 만 뽑아서 여러 전략으로 순회가 가능

!! 자바 컬렉션 프레임워크에서 각 컬렉션을 순회 가능한 것도 내부에 미리 Iterator 패턴이 적용되어 있기 때문 !!

Aggregate (인터페이스)
ConcreteIterator 객체를 반환하는 인터페이스 제공
ConcreteAggregate (클래스)
여러 요소들이 이루어져 있는 데이터 집합
Iterator (인터페이스)
집합 내의 요소들을 순서대로 검색하기 위한 인터페이스 제공
- hasNext() : 순회할 다음 요소가 있는지 확인
- next() : 요소를 반환하고 다음 요소를 반환 준비를 위한 커서 이동
ConcreteIterator (클래스)
ConcreteAggregate 가 구현한 메소드로부터 생성
ConcreteAggregate 의 컬렉션을 참조하여 순회
어떤 전략으로 순회할지에 대한 로직의 구체화
이를 코드로 구현해보면
public interface Aggregate {

    Iterator iterator();
}
public class ConcreteAggregate implements Aggregate{
Object[] arr; // 데이터의 집합
int index = 0;
public ConcreteAggregate(int size){
this.arr= new Object[size];
}
public void add(Object o){
if(index < arr.length){
arr[index] = o;
index++;
}
}
@Override
public Iterator iterator() {
return new ConcreteIterator(arr);
}
}데이터 집합 객체 Aggregate 인터페이스와 그걸 상속받은 ConcreteAggregate 클래스
ConcreteAggregate 클래스는 생성자로 생성될 때 전달받은 size 만큼 크기를 가진 배열 생성 (데이터집합 생성)
add : 생성한 Object 배열에 각가의 요소들 삽입
iterator : 내부 컬렉션을 인자로 넣어 반복자 구현체를 반환
public interface Iterator {
    boolean hasNext();
    Object next();
}
반복체 객체 Iterator 인터페이스
public class ConcreteIterator implements Iterator{

    Object[] arr;
    private int nextIndex = 0;

    public ConcreteIterator(Object[] arr){
        this.arr = arr;
    }

    @Override
    public boolean hasNext() {
        return nextIndex < arr.length;
    }

    @Override
    public Object next() {
        return arr[nextIndex++];
    }
}
nextIndex : 커서 (for문의 i변수)
concreteIterator : 전달받은 데이터 집합 컬렉션을 받아 필드에 참조
hasNext : 다음 요소가 있는지
next : 현재 요소를 반환하고 커서를 증가시켜 다음 요소를 바라보도록
public class Main {


    public static void main(String[] args) throws Exception {

        ConcreteAggregate concreteAggregate = new ConcreteAggregate(5);
        concreteAggregate.add(1);
        concreteAggregate.add(2);
        concreteAggregate.add(3);
        concreteAggregate.add(4);
        concreteAggregate.add(5);

        Iterator iterator = concreteAggregate.iterator();

        while(iterator.hasNext()){
            System.out.println(iterator.next());
        }
    }
}
size 5 의 concreateAggregate 객체 생성 (데이터 집합)
값 삽입
데이터 집합의 반복자를 참조하는 iterator 변수 생성
while 문으로 iterator 의 다음 요소가 있는지, 있다면 현재 요소를 반환하고 다음 요소를 가리키는 동작을 반복하며 요소 출력
옵저버 패턴 Observer Pattern
한 객체의 상태가 바뀌면 그 객체에 의존하는 다른 객체들이 이를 알아차리고, 자동으로 내용이 갱신되는 방식으로 1대 다 의존성을 정의
대부분 Subject 인터페이스와 Observer 인터페이스가 들어있는 클래스 디자인
interface Subject {
	registerObserver() // 옵저버 등록
	removeObserver() // 옵저버 삭제
	notifyObserver() // 옵저버에게 업데이트 알림
}

class SubjectImpl implements Subject {
	registerObserver() { ... }
	removeObserver() { ... }
	notifyObserver() { ... }

	getState() // 주제 객체는 상태를 설정하고 알기위한 겟터,셋터가 있을 수 있다.
	setState()
}
Subject 인터페이스와 구현체
interface Observer{ // 옵저버가 될 객체에서는 반드시 Observer 인터페이스를 구현해야함.
	update() // 주제의 상태가 바뀌었을때 호출됨
}

class ObserverImpl implements Observer {
	update() {
		// 주제가 업데이트 될 때 해야하는 일
	}
}
옵저버 인터페이스와 구현체
현재날씨, 예보, 기상 통계를 불러오는 프로그램을 옵저버 패턴으로 구현해보면
public interface Subject {

    public void registerObserver(Observer o);
    public void removeObserver(Observer o);
    public void notifyObserver();
}
public interface Observer {
public void update(float temperature, float humidity, float pressure);
}public interface DisplayElement {
public void display();
}Subject, Observer, DisplayElement 인터페이스 정의
public class WeatherData implements Subject{

    private List<Observer> observers;
    private float humidity;
    private float temperature;
    private float pressure;


    public WeatherData() {
        observers = new ArrayList<>();
    }

    @Override
    public void registerObserver(Observer o) {
        observers.add(o);
    }

    @Override
    public void removeObserver(Observer o) {
        observers.remove(o);
    }

    @Override
    public void notifyObserver() {
        for(Observer observer : observers){
            observer.update(temperature, humidity, pressure);
        }
    }

    public void measurementsChanged(){
        notifyObserver();
    }

    public void setMeasurements(float temperature, float humidity, float pressure){

        this.temperature = temperature;
        this.humidity = humidity;
        this.pressure = pressure;
        measurementsChanged();
    }

    public float getTemperature(){
        return temperature;
    }

    public float getHumidity(){
        return humidity;
    }

    public float getPressure(){
        return pressure;
    }
}
날씨 (온도, 습도, 기압) 정보를 담는 객체 클래스
observers : 옵저버를 담는 리스트
register, remove, notify 메소드 각각 재정의
measurementsChanged : 측정 정보가 변경될 경우 재정의된 notifyObservers 를 통해 데이터 업데이트
그 외 getter 메소드들
public class CurrentConditionsDisplay implements Observer, DisplayElement{


    private float temperature;
    private float humidity;
    private WeatherData weatherData;

    public CurrentConditionsDisplay(WeatherData weatherData){
        this.weatherData = weatherData;
        weatherData.registerObserver(this);
    }

    @Override
    public void update(float temperature, float humidity, float pressure) {
        this.temperature = temperature;
        this.humidity = humidity;
        display();
    }

    @Override
    public void display() {
        System.out.println("Current conditions : "+temperature + "F degrees and "+humidity+"% humidity");
    }
}
최근 상태 표시 클래스
WeaterData 를 바탕으로 최근 날씨 상태를 가지고 있는 클래스
역시 update, display 재정의를 통해 observer 로부터 데이터의 변동을 인지하고 변경된 데이터를 출력
public class ForecastDisplay implements Observer, DisplayElement{

    private float currentPressure = 29.92f;
    private float lastPressure;
    private WeatherData weatherData;


    public ForecastDisplay(WeatherData weatherData) {
        this.weatherData = weatherData;
        weatherData.registerObserver(this);
    }

    @Override
    public void display() {
        System.out.println("Forecast : ");
        if(currentPressure > lastPressure){
            System.out.println("Improving weather on the way !");
        }
        else if(currentPressure == lastPressure){
            System.out.println("More of the same");
        }
        else if(currentPressure < lastPressure){
            System.out.println("Watch out for cooler, rainy weather");
        }
    }

    @Override
    public void update(float temperature, float humidity, float pressure) {
        lastPressure = currentPressure;
        currentPressure = pressure;
        display();
    }
}
날씨 예보를 출력하는 ForecastDisplay 클래스
display 에서 온도 차를 비교하여 적절한 문장 출력
update 에서 lastPressure 데이터를 최산화
public class StatisticsDisplay implements Observer, DisplayElement{

    private float maxTemp = 0.0f;
    private float minTemp = 200;
    private float tempSum = 0.0f;

    private int numReadings;
    private WeatherData weatherData;

    public StatisticsDisplay(WeatherData weatherData) {
        this.weatherData = weatherData;
        weatherData.registerObserver(this);
    }

    @Override
    public void update(float temperature, float humidity, float pressure) {
        tempSum += temperature;
        numReadings++;

        if(temperature > maxTemp) {
            maxTemp = temperature;
        }
        if(temperature < minTemp){
            minTemp = temperature;
        }
        display();
    }


    @Override
    public void display() {
        System.out.println("Avg/Max/Min temperature = "+(tempSum/numReadings)+"/"+maxTemp+"/"+minTemp);
    }
}
날씨 통계 클래스
평균, 최대, 최소 온도를 display
최대, 최소 온도 갱신 update
public class Main {


    public static void main(String[] args) throws Exception {


        WeatherData weatherData = new WeatherData();

        CurrentConditionsDisplay currentConditionsDisplay = new CurrentConditionsDisplay(weatherData);
        StatisticsDisplay statisticsDisplay = new StatisticsDisplay(weatherData);
        ForecastDisplay forecastDisplay = new ForecastDisplay(weatherData);

        weatherData.setMeasurements(80, 65, 30.4f);
        weatherData.setMeasurements(82, 70, 29.2f);
        weatherData.setMeasurements(78, 90, 29.2f);

        weatherData.removeObserver(forecastDisplay);
        weatherData.setMeasurements(62, 90, 281f);

    }
}
메인함수
구조 패턴 Structural Pattern
데코레이터 패턴 Decorator Pattern

객체의 결합을 통해 기능을 동적으로 유연하게 확장할 수 있게 해주는 패턴
추가 기능을 Decorator 클래스로 정의한 후 필요한 Decorator 객체를 조합함으로써 추가 기능의 조합을 설계하는 방식
말 그대로 어떤 오브젝트에 대해 데코레이션 하듯이 기능을 추가
ex)
도로 표시 방법 조합하기

네비게이션 프로그램에서 도로를 표시하는 기능을 구현한다고 할 때
네비게이션 프로그램에 따라 도로의 차선을 표시하는 기능을 추가적으로 구현하려면
public class RoadDisplay {

    public void draw(){
        System.out.println("basic road display");
    }
}
public class RoadDisplayWithLane extends RoadDisplay{
public void draw(){
super.draw();
drawLane();
}
private void drawLane(){
System.out.println("road with lane display");
}
}public class Main {
public static void main(String[] args) throws Exception {
RoadDisplay roadDisplay = new RoadDisplay();
roadDisplay.draw();
RoadDisplay roadDisplayWithLane = new RoadDisplayWithLane();
roadDisplayWithLane.draw();
}
}
기본 도로 표시 기능, 차선 표시 기능을 각각 구현한 모습
RoadDisplayWithLane 클래스에는 차선 표시 기능을 추가하기 위해 RaodDisplay 클래스를 상속하고 draw 메소드를 오버라이딩
여기서 또 다른 Display 를 추가로 구현하려고 하면?
RoadDisplayWithLane 과 같이 RoadDisplay 클래스를 상속받은 RoadDisplayWithXX 와 같은 클래스 구현
추가 기능이 많으면 많을 수록 그에 해당하는 클래스를 각각 구현해야 함


Lane, Traffic, Crossing 등..
위와 같이 원하는 기능을 조합한 기능을 구현하고자 하면 상당히 복잡할 수 있음
데코레이터 패턴을 사용하면 각 추가 기능별로 개별적인 클래스를 설계하고 기능을 조합할 때 각 클래스의 객체 조합을 이용하면 됨

각각의 기능을 말 그대로 데코 하듯이 조합하여 사용
public abstract class Display {

    public abstract void draw();
}
public class RoadDisplay extends Display{
@Override
public void draw(){
System.out.println("basic road display");
}
}public class DisplayDecorator extends Display{
private Display decoDisplay;
public DisplayDecorator (Display decoDisplay){
this.decoDisplay = decoDisplay;
}
@Override
public void draw() {
decoDisplay.draw();
}
}public class LaneDecorator extends DisplayDecorator{
public LaneDecorator(Display decoDisplay) {
super(decoDisplay);
}
@Override
public void draw() {
super.draw();
drawLane();
}
private void drawLane(){
System.out.println("lane display");
}
}public class TrafficDecorator extends DisplayDecorator{
public TrafficDecorator(Display decoDisplay) {
super(decoDisplay);
}
@Override
public void draw() {
super.draw();
drawTraffic();
}
private void drawTraffic(){
System.out.println("traffic display");
}
}public class Main {
public static void main(String[] args) throws Exception {
Display display = new RoadDisplay();
display.draw();
Display laneDisplay = new LaneDecorator(new RoadDisplay());
laneDisplay.draw();
Display trafficDisplay = new TrafficDecorator(new RoadDisplay());
trafficDisplay.draw();
}
}
DisplayDecorator 를 상속받은 하위 기능 클래스들을 구현

이와 같은 구조로 구현 가능
Lane 과 Traffic 을 함께 표현하고 싶다면?
        Display laneTrafficDisplay = new TrafficDecorator(new LaneDecorator(new RoadDisplay()));
        laneTrafficDisplay.draw();
이와 같이 사용 가능
1. 가장 먼저 생성된 RoadDisplay 객체의 draw 메소드 실행
2. 첫 번째 추가 기능인 LaneDecorator 클래스의 drawLane 메소드 실행
3. 두 번째 추가 기능인 TrafficDecorator 클래스의 drawTraffic 메소드 실행
프록시 패턴 Proxy Pattern

구체적인 인터페이스를 사용하고 실행시킬 클래스에 대한 객체가 들어갈 자리에 Proxy 객체를 대신 투입
클라이언트가 어떤 일에 대한 요청을 하면, Proxy 가 대신 Subject 의 request 메소드를 호출
그 반환값을 클라이언트에게 전달
public interface Service {
    String run();
}
public class ServiceImpl implements Service{
@Override
public String run() {
return "run something";
}
}public class Proxy implements Service{
Service service;
@Override
public String run() {
service = new ServiceImpl();
return service.run();
}
}public class Main {
public static void main(String[] args) throws Exception {
Service proxyService = new Proxy();
System.out.println(proxyService.run());
}
}
기본적인 Proxy 패턴의 구조
ServiceImpl 클래스에서 바로 run 메소드를 호출하지 않고 Proxy 를 거쳐서 실행
기능에는 변함이 없지만, 제어의 흐름을 관리하기 위해서 사용
ex)
용량이 큰 이미지와 글이 함께 있는 문서를 화면에 띄우기 위한 프로그램
텍스트는 용량이 작아서 빠르게 출력이 가능하지만, 이미지는 큰 용량으로 느리게 출력되는 상황에서
텍스트, 이미지의 출력을 동시에 구현하고 싶은 상황
public interface Image {

    public void displayImage();
}
public class OriginImage implements Image{
private String fileName;
public OriginImage(String fileName) {
this.fileName = fileName;
}
private void loadFromDisk(String fileName){
System.out.println("loading file .. "+fileName);
}
@Override
public void displayImage() {
System.out.println("display "+fileName);
}
}public class ProxyImage implements Image{
private String fileName;
private OriginImage originImage;
public ProxyImage(String fileName) {
this.fileName = fileName;
}
@Override
public void displayImage() {
if(originImage == null){
originImage = new OriginImage(fileName);
}
originImage.displayImage();
}
}public class Main {
public static void main(String[] args) throws Exception {
Image firstImage = new ProxyImage("test1");
Image secondImage = new ProxyImage("test2");
firstImage.displayImage();
secondImage.displayImage();
}
}
OriginImage 클래스의 displayImage 메소드를 바로 호출하지 않고, ProxyImage 클래스를 거쳐 호출함으로써
displayImage 를 호출하기 전, 후에 대한 동작 제어가 가능
컴포지트 패턴 Composite Pattern

합성한 객체의 집합
트리 구조를 작성하고 싶을 때 사용
전체-부분 관계를 표현
폴더 시스템에 비유 가능 (계층적 구조)
상위 클래스를 두고 하위에 Leaf 클래스
Leaf 클래스들은 Composite 형태로 Leaf 를 담아두는 복합체나, 단순한 하나의 Leaf 일 수도 있음
하위 Leaaf 들은 동작하는 메소드를 상속, 재정의 하여 사용

Depth 를 가진 구조
ex)
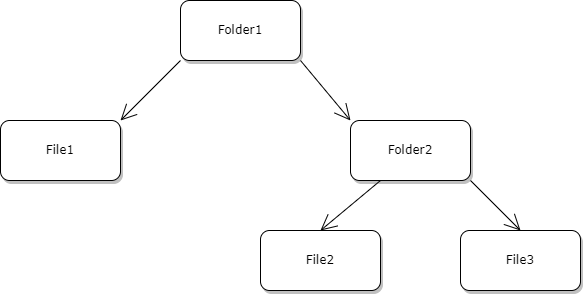

위와 같은 구조의 파일 시스템 구현
폴더가 2개 있고, 한 폴더는 사위 폴더 하에 있으며, 상위 폴더는 하나의 파일도 보유
하위 폴더에는 2개의 파일 존재
public interface FileSystem {

    public int getSize();
    public void remove();
}
public class File implements FileSystem{
private String name;
private int size;
public File(String name, int size) {
}
@Override
public int getSize() {
System.out.println("file size : "+size);
return size;
}
@Override
public void remove() {
System.out.println("delete file");
}
}public class Folder implements FileSystem{
private String name;
private List<FileSystem> included = new ArrayList<>();
public Folder(String name) {
this.name = name;
}
public void add(FileSystem fileSystem){
included.add(fileSystem);
}
@Override
public int getSize() {
int total = 0;
for(FileSystem include : included){
total += include.getSize();
}
System.out.println(name+" size : "+total);
System.out.println("------------------");
return total;
}
@Override
public void remove() {
for(FileSystem include : included){
include.remove();
}
System.out.println("delete "+name);
System.out.println("------------------");
}public class Main {
public static void main(String[] args) throws Exception {
Folder schoolFolder = new Folder("school");
Folder firstGradeFolder = new Folder("first grade folder");
Folder secondGradeFolder = new Folder("second grade folder");
schoolFolder.add(firstGradeFolder);
schoolFolder.add(secondGradeFolder);
File enterPhoto = new File("graduated photo", 256);
firstGradeFolder.add(enterPhoto);
Folder firstSemesterFolder = new Folder("first semester");
Folder secondSemesterFolder = new Folder("second semester");
secondGradeFolder.add(firstSemesterFolder);
secondGradeFolder.add(secondSemesterFolder);
File syllabus = new File("syllabus", 120);
secondSemesterFolder.add(syllabus);
Folder project = new Folder("project");
secondSemesterFolder.add(project);
File finalResult = new File("final result", 560);
project.add(finalResult);
schoolFolder.getSize();
schoolFolder.remove();
}
}

위와 같은 트리 구조의 FileSystem 구현
어댑터 패턴 Adapter Pattern

한 클래스의 인터페이스를 클라이언트에서 사용하고자 하는 다른 인터페이스로 변환
인터페이스 호환성 문제 때문에 같이 쓸 수 없는 클래스들을 연결해서 사용 가능
나중에 인터페이스가 바뀌더라도 그 변경 내역은 어댑터에 캡슐화 되기 때문에 클라이언트의 변경 X
- 외부 라이브러리 클래스를 사용하고 싶은데, 클래스 인터페이스가 다른 코드와 호환되지 않을 때 이를 해결하기 위해 어댑터 사용 가능
- 여러 자식 클래스가 있는데, 부모 클래스를 수정하기에는 호환성이 문제가 될 때 해결 가능
어댑터 패턴은 크게 두 가지로 분류 가능
1. 객체 어댑터

합성된 멤버에게 위임을 이용한 어댑터 패턴
자기가 해야할 일을 클래스 멤버 객체의 메소드에 다시 시킴으로써 목적을 달성하는것을 위임이라고 함
합성을 활용했기 때문에 런타임중에 Adaptee(Service) 가 결정되어 유연한 구조
Adaptee(Service) 객체를 필드변수로 저장해야 하기 때문에 메모리 차지
2. 클래스 어댑터

클래스 상속을 이용한 어댑터 패턴
Adaptee(Service) 를 상속했기 때문에 객체 구현 없이 바로 코드 재사용 가능
상속은 대표적으로 기존 구현 코드를 재사용하는 방법이지만, 자바에서는 다중상속 불가 문제때문에 전반적으로 권장하지 않음
ex)
프로그램 엔진을 교체하고 호환시키기
A 회사에서 개발한 Sort 엔진 솔루션 구매해서 우리 회사의 Sort 머신에 탑재하여 사용하고 있는 상태
public interface SortEngine {

    public void setList();
    public void sort();
    public void reverseSort();
    public void printSortListPretty();
}
public class SortEngineAImpl implements SortEngine{
@Override
public void setList() {
}
@Override
public void sort() {
}
@Override
public void reverseSort() {
}
@Override
public void printSortListPretty() {
}
}public class SortingMachine {
SortEngine engine;
public void setEngine(SortEngine engine){
this.engine = engine;
}
public void sort(){
engine.setList();
engine.sort();
engine.printSortListPretty();
engine.reverseSort();
engine.printSortListPretty();
}
public static void main(String[] args){
SortingMachine machine = new SortingMachine();
machine.setEngine(new SortEngineAImpl());
machine.sort();
}
}
여기서 A 회사의 Sort 엔진 성능이 맘에 들지 않아, B 회사로 갈아타려고 한다
B 회사의 엔진 명세를 살펴보니, 기존 Sort 엔진과는 동작 메서드 시그니처가 다르고 지원하지 않는 메서드도 존재
public class SortEngineB {

    public void setList(){}

    public void sort(boolean isReverse){}
}
Sort 인터페이스를 상속받아 사용하고 있었기 때문에 B 사의 엔진에 인터페이스를 implements 불가능
>> 이는 큰 수정이 필요
또한 printSortListPretty 메소드의 부재
가장 직관적인 방법은 SortingMachine 클래스를 수정하는 방법
기존 SortEngine 인터페이스의 메소드를 비우고
public class SortingMachine {

    SortEngine engine;

    public void setEngine(SortEngine engine){
        this.engine = engine;
    }

    public void sort(){

        SortEngineAImpl engineA = (SortEngineAImpl) this.engine;
        SortEngineBImpl engineB = (SortEngineBImpl) this.engine;

        engineA.setList();
        engineA.printSortListPretty();

        engineB.setList();
        engineB.sort(false);
    }


    public static void main(String[] args){

        SortingMachine machine = new SortingMachine();
        machine.sort();
    }
}
처럼 각각 다운캐스팅하여 호환
문제는 나중에 엔진을 또 교체해야 하는 상황이 발생한다면, 코드를 또 전면적으로 수정해야 함
1. 객체 어댑터 패턴 적용
우리 회사의 Sort 엔진에서 이요하던 인터페이스를 손대지 않고 별도의 어댑터 SortEngineAdapter 클래스를 만들어 호환작업
public interface SortEngine {

    public void setList();
    public void sort();
    public void reverseSort();
    public void printSortListPretty();
}
인터페이스는 그대로 놔두고
public class SortEngineAdapter implements SortEngine{

    SortEngineAImpl engineA;
    SortEngineBImpl engineB;

    public SortEngineAdapter(SortEngineAImpl engineA, SortEngineBImpl engineB) {
        this.engineA = engineA;
        this.engineB = engineB;
    }

    @Override
    public void setList() {
        engineB.setList();
    }

    @Override
    public void sort() {
        engineB.sort(false);
    }

    @Override
    public void reverseSort() {
        engineB.sort(true);
    }

    @Override
    public void printSortListPretty() {
        engineA.printSortListPretty();
    }
}
SortEngine 인터페이스를 상속받은 어댑터를 구현
printSortListPretty 와 같은 메소드는 A 엔진의 메소드를 사용하고 나머지는 속도가 빠른 B 엔진 사용
public class SortingMachine {

    SortEngine engine;

    public void setEngine(SortEngine engine){
        this.engine = engine;
    }

    public void sort(){

        engine.setList();
        engine.sort();
        engine.printSortListPretty();
        engine.reverseSort();
        engine.printSortListPretty();
    }


    public static void main(String[] args){

        SortEngine adapter = new SortEngineAdapter(new SortEngineAImpl(), new SortEngineBImpl());

        SortingMachine machine = new SortingMachine();
        machine.setEngine(adapter);
        machine.sort();
    }
}
위와 같이 사용 가능
이렇게 구현하면, 나중에 엔진을 또 교체하거나 추가한다고 하더라도 Adpter 클래스만 적절하게 수정하면 되기 때문에 유지보수 용이
기존 클라이언트 (SortingMachine) 클래스의 코드 수정 필요 X
2. 클래스 어댑터 패턴 적용
public class SortEngineAdapter extends SortEngineBImpl implements SortEngine{

    @Override
    public void setList() {
        super.setList();
    }

    @Override
    public void sort() {
        sort(false);
    }

    @Override
    public void reverseSort() {
        sort(true);
    }

    @Override
    public void printSortListPretty() {
        // A 클래스의 원본 printSortListPretty 메소드 알고리즘 로직을 똑같이 구현
    }
}
B 엔진 클래스와 SortEngine 인터페이스를 각각 상속받은 어댑터 (SortEngineAdapter) 구현
public class SortingMachine {

    SortEngine engine;

    public void setEngine(SortEngine engine){
        this.engine = engine;
    }

    public void sort(){

        engine.setList();
        engine.sort();
        engine.printSortListPretty();
        engine.reverseSort();
        engine.printSortListPretty();
    }


    public static void main(String[] args){

        SortEngine adapter = new SortEngineAImpl();
        SortingMachine machine = new SortingMachine();

        machine.setEngine(adapter);
        machine.sort();
    }
}
SortingMachine 객체에 원본 엔진 대신 어댑터를 할당하고 사용
>> 클래스 다중상속 문제때문에 권장하지는 않는 방법
퍼사드 패턴 Facade Pattern

서브 시스템을 보다 쉽게 쓸 수 있도록 높은 수준의 인터페이스를 정의하는 작업
강력한 결합 구조를 해결하기 위해 코드 의존성 줄이고 느슨한 결합으로 구조 변경
메인 시스템 < 퍼사드 패턴 > 서브시스템 이렇게 중간에 새로운 인터페이스 계층을 추가하여 시스템 사이의 의존성 해결
인터페이스 계층은 메인 시스템과 서브 시스템의 견결 관계를 대신 처리
객체 내부 구조 상세히 알 필요 X
퍼사드 패턴은 시스템 연결성, 종속성 최소화를 목적으로 함
최소 지식 원칙 : 최소 지식만 적용해 객체 상호작용을 구현하면 유지보수 용이
ex)
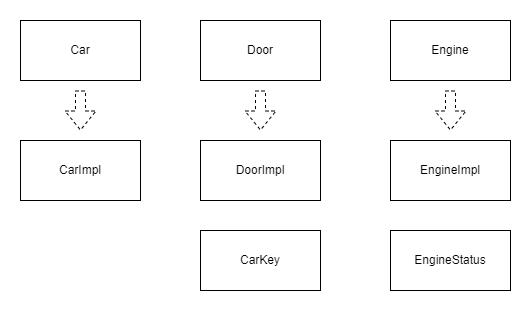
자동차의 구성품을 퍼사드 패턴으로 구현
public interface Car {

    public void open(String key);
    public void drive(String key);
    public void stop();
    String getName();
}
Car 인터페이스
public class CarKey {

    private String key;

    public CarKey(String key){
        this.key = key;
    }

    public boolean turns(String key){
        return this.key.equals(key);
    }
}
Door 인터페이스에서 사용하는 CarKey 클래스
public enum EngineStatus {

    DRIVE("drive", "운행"),
    STOP("stop", "정지");

    private final String code;
    private final String displayName;

    EngineStatus(String code, String displayName) {
        this.code = code;
        this.displayName = displayName;
    }

    public String getCode(){
        return code;
    }
    public String getDisplayName(){
        return displayName;
    }
}
Engine 인터페이스에서 사용하는 EngineStatus 열거형
public interface Door {
    public void lock(String key);
    public void unlock(String key);

    CarKey getKey();
}
public interface Engine {
public void start();
public void stop();
EngineStatus status();
}Door, Engine 인터페이스
public class DoorImpl implements Door{

    private boolean lock;
    private CarKey key;

    public DoorImpl(CarKey key) {
        this.key = key;
        this.lock = true;
    }

    @Override
    public void lock(String key) {
        if(!this.key.turns(key)){
            throw new CarKeyNotMatchException();
        }
        System.out.println("door is close");
    }

    @Override
    public void unlock(String key) {
        if(!this.key.turns(key)){
            throw new CarKeyNotMatchException();
        }
        System.out.println("door is open");
    }

    @Override
    public CarKey getKey() {
        return key;
    }
}
public class EngineImpl implements Engine{
EngineStatus engineStatus;
public EngineImpl() {
this.engineStatus = EngineStatus.STOP;
}
@Override
public void start() {
this.engineStatus = EngineStatus.DRIVE;
}
@Override
public void stop() {
this.engineStatus = EngineStatus.STOP;
}
@Override
public EngineStatus status() {
return this.engineStatus;
}
}Door, Engine 인터페이스의 구현체
public class CarKeyNotMatchException extends IllegalArgumentException{

    public CarKeyNotMatchException() {
        super("key does not match");
        System.out.println("CarKeyNotMatchException");
    }
}
Key 일치하지 않을 때 발생하는 Exception 클래스
public class CarImpl implements Car{

    private Engine engine;
    private String name;
    private Door door;

    public CarImpl(Engine engine, String key) {
        this.engine = engine;
        this.name = "Hyundai";
        this.door = new DoorImpl(new CarKey(key));
    }

    @Override
    public void open(String key) {
        door.unlock(key);
    }

    @Override
    public void drive(String key) {

        boolean authorized = this.door.getKey().turns(key);

        if(authorized){
            engine.start();
            this.updateDashboardDisplay();
            door.lock(key);
        }
        else{
            throw new CarKeyNotMatchException();
        }
    }

    @Override
    public void stop() {
        engine.stop();
        this.updateDashboardDisplay();
    }

    @Override
    public String getName() {
        return this.name;
    }

    private void updateDashboardDisplay(){
        System.out.println(getName()+" "+engine.status().getDisplayName());
    }
}
Car 구현체
public class CarTest {

    public void driveTest(){
        String key = "CAR_SECRET_KEY";
        Car car = new CarImpl(new EngineImpl(), key);

        car.open(key);
        car.drive(key);
        car.stop();
    }

    public void driveInvalidTest(){
        String key = "CAR_SECRET_KEY";
        Car car = new CarImpl(new EngineImpl(), key);
        assertThrows(CarKeyNotMatchException.class, ()->{car.open("INVALID KEY");});
    }
}
테스트 코드
이와 같은 퍼사드 패턴 구조로 표현 가능
'끄적 > ?' 카테고리의 다른 글
| HashMap Key에 Object (0) | 2023.09.17 |
|---|---|
| 업캐스팅 다운캐스팅 (0) | 2023.08.27 |
| Generic (0) | 2023.08.27 |
| Java ArrayList와 List 차이 (0) | 2023.08.27 |
| String, StringBuffer, StringBuilder (0) | 2023.08.27 |